With Docker images, you can easily deploy containers without having to worry about maintaining the same overhead required by virtual machines. These containers can be pulled from the Docker Hub with ease, for easy use. Let's say, for example, you want to pull down the latest Ubuntu image for development purposes. However, before you start development, there are a number of changes you need to make to the image (such as updating, upgrading, and adding the build-essential package to the mix). Now, what if you plan on needing that same customized image for a number of development projects? You could always pull the latest Ubuntu image and then manually run the commands to update, upgrade, and install build-essential.
I want to show you how to craft a Dockerfile so you can make the process of building a specific image a no-brainer. The image we will create is as described above: The latest image of Ubuntu, updated and upgraded, and with the build-essential package installed. This will be a fairly simple example of how Dockerfiles are used.
The basics
The first thing you need to know is that the Dockerfile is a text file, named Dockerfile, that contains commands. The available commands are:
- ADD - copies the files from a source on the host into the container's own filesystem at the set destination
- CMD - can be used for executing a specific command within the container
- ENTRYPOINT - sets a default application to be used every time a container is created with the image
- ENV - sets environment variables
- EXPOSE - associates a specific port to enable networking between the container and the outside world
- FROM - defines the base image used to start the build process
- MAINTAINER - defines a full name and email address of the image creator
- RUN - central executing directive for Dockerfiles
- USER - sets the UID (or username) which is to run the container
- VOLUME - is used to enable access from the container to a directory on the host machine
- WORKDIR - sets the path where the command, defined with CMD, is to be executed
You do not have to use every command. In fact, I am going to demonstrate a Dockerfile using only FROM, MAINTAINER, and RUN.
Creating your Dockerfile
The first thing we're going to do is create a new directory to work within; so open a terminal window and issue the command mkdir ~/mydockerbuild. Change into that newly created directory with the command cd ~/mydockerbuild. Now we create our Dockerfile with the command nano Dockerfile and add the following contents:
MAINTAINER NAME EMAIL
FROM ubuntu:latest
RUN apt-get -y update && apt-get -y upgrade && apt-get install -y build-essential
Where NAME is the name to be used as the maintainer and EMAIL is the maintainer's email address.
Save and close that file.
Building the image
Now we build an image from our Dockerfile. This is run with the command (by a user in the docker group):
docker run -it NAME .
Where NAME is the name of the image to be built.
Say I want to build multiple images from this Dockerfile, one for web development, app development, and security development. I could build them with the following commands:
docker run -it webdev .
docker run -it appdev .
docker run -it secdev .
Do note the trailing period is necessary for each command.
Once the build completes, you can issue the command docker images to see all of your newly created images (Figure A).
Figure A
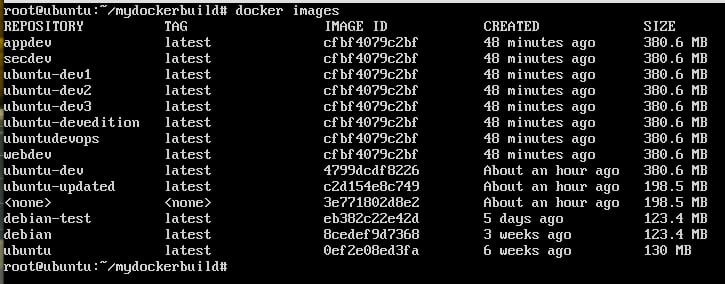
All of my docker images conveniently listed.
And that is all there is to using Dockerfiles. Granted, this is a very simplistic illustration, but it will give you the springboard by which you can create more complicated Dockerfiles and docker images.

